Here is a list of main deliverables of the project; their details are given in the subsequent sections.
- Product
- Documentation
- Product Demo
- Practical Exam Dry Run (PE-D)
- Practical Exam (PE)
Deliverable: Executable
- Should be an executable jar file.
- Should be i.e., it can be used by end-usersreleasable. While some features may be scheduled for later versions, the features in v1.4 should be good enough to make it usable by at least some of the target users.
- Also note the following constraint:
Admin tP Contstraints → Constraint-File-Size
Deliverable: Source code
- Should match v1.4 deliverables i.e., executable, docs, website, etc.
- To be delivered as a Git repo. Ensure your GitHub team repo is updated to match the executable.
Deliverable: User Guide (UG)
- Should cover all v1.4 features.
Ensure those descriptions match the product precisely, as it will be used by peer testers (inaccuracies will be considered bugs). - Optionally, can also cover future features. Mark those as
Coming in v2.0. - Also note the following constraint:
Admin tP Contstraints → Constraint-File-Size
Deliverable: Developer Guide (DG)
- Should match the v1.4 implementation.
- Optionally, can include proposed implementations of future features.
-
Include an appendix named Instructions for Manual Testing, to give some guidance to the tester to chart a path through the features, and provide some important test inputs the tester can copy-paste into the app.
- Cover all user-testable features but no need to cover existing AB3 features if you did not touch them.
- No need to give a long list of test cases including all possible variations. It is upto the tester to come up with those variations.
- Inaccurate instructions will be considered bugs.
-
We highly recommend adding an appendix named
Effortthat evaluators can use to estimate the total project effort.- Keep it brief (~1 page)
- Explain the difficulty level, challenges faced, effort required, and achievements of the project.
- Use AB3 as a reference point e.g., you can explain that while AB3 deals with only one entity type, your project was harder because it deals with multiple entity types.
DG Tips
- Aim to showcase your documentation skills. The stated objective of the DG is to explain the implementation to a future developer, but a secondary objective is to show evidence that you can document deeply-technical content using prose, examples, diagrams, code snippets, etc. appropriately. To that end, you may also describe features that you plan to implement in the future, even beyond v1.4 (hypothetically).
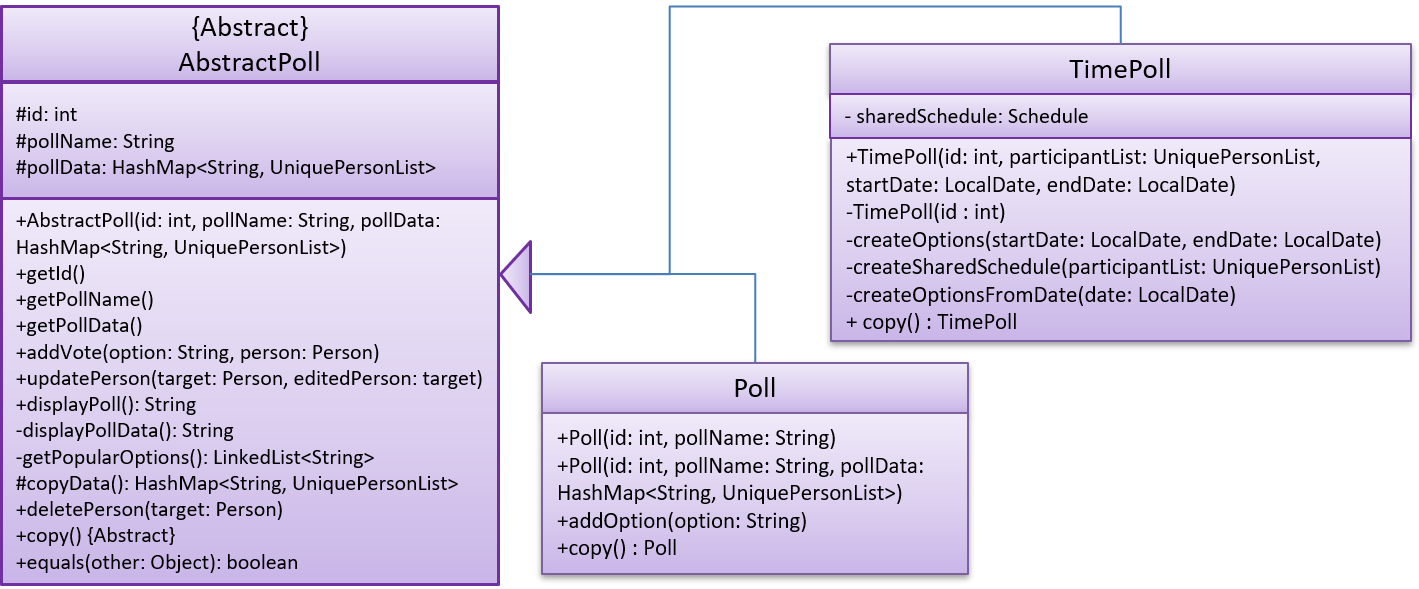
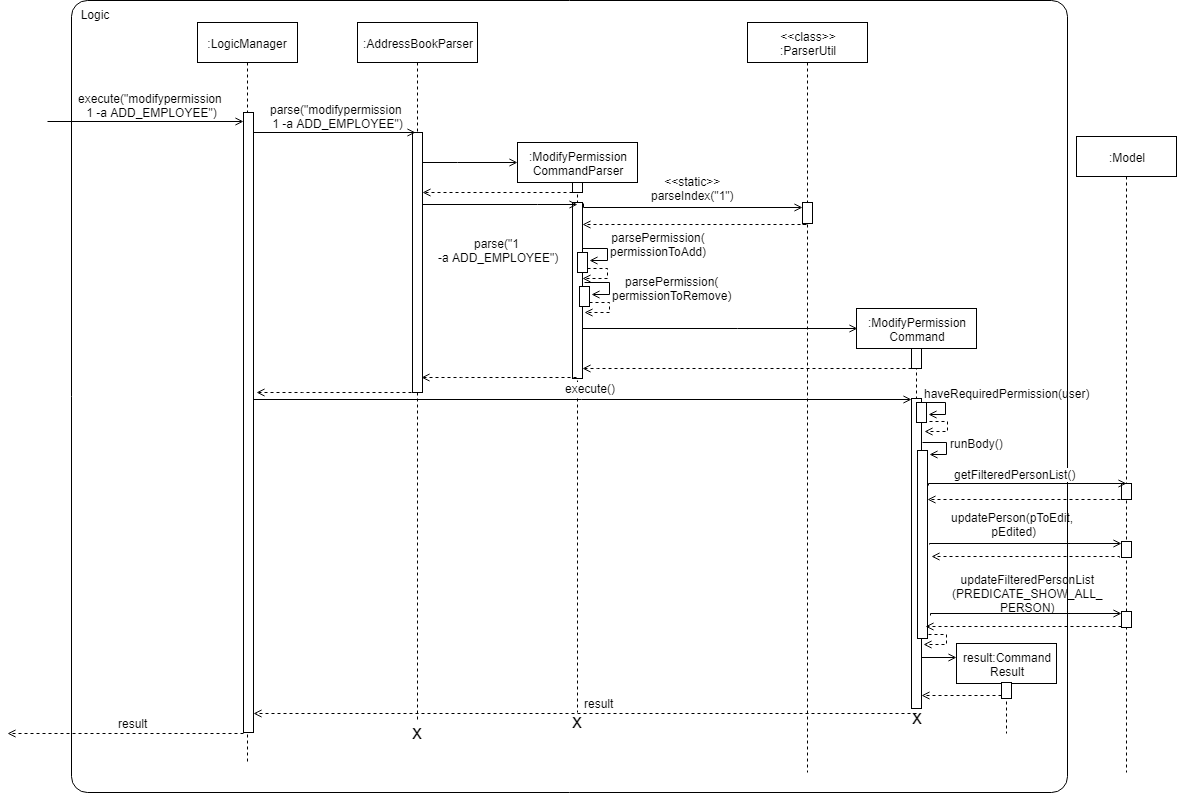
For an example, see the description of the undo/redo feature implementation in the AddressBook-Level3 developer guide. - Use multiple UML diagram types. Following from the point above, try to include UML diagrams of multiple types to showcase your ability to use different UML diagrams. As a rule of thumb, include at least one structure and one behavior diagram to explain your implementation.
- Keep diagrams simple. The aim is to make diagrams comprehensible, not necessarily comprehensive. However, do not skip necessary details, like visibility, multiplicity etc., that define your implementation. Ways to simplify diagrams:
- Omit less important details. Examples:
- a class diagram can omit minor utility classes, private/unimportant members; some less-important associations can be shown as attributes instead.
- a sequence diagram can omit less important interactions, self-calls.
- Omit repetitive details e.g., a class diagram can show only a few representative ones in place of many similar classes (note how the AB3 Logic class diagram shows concrete
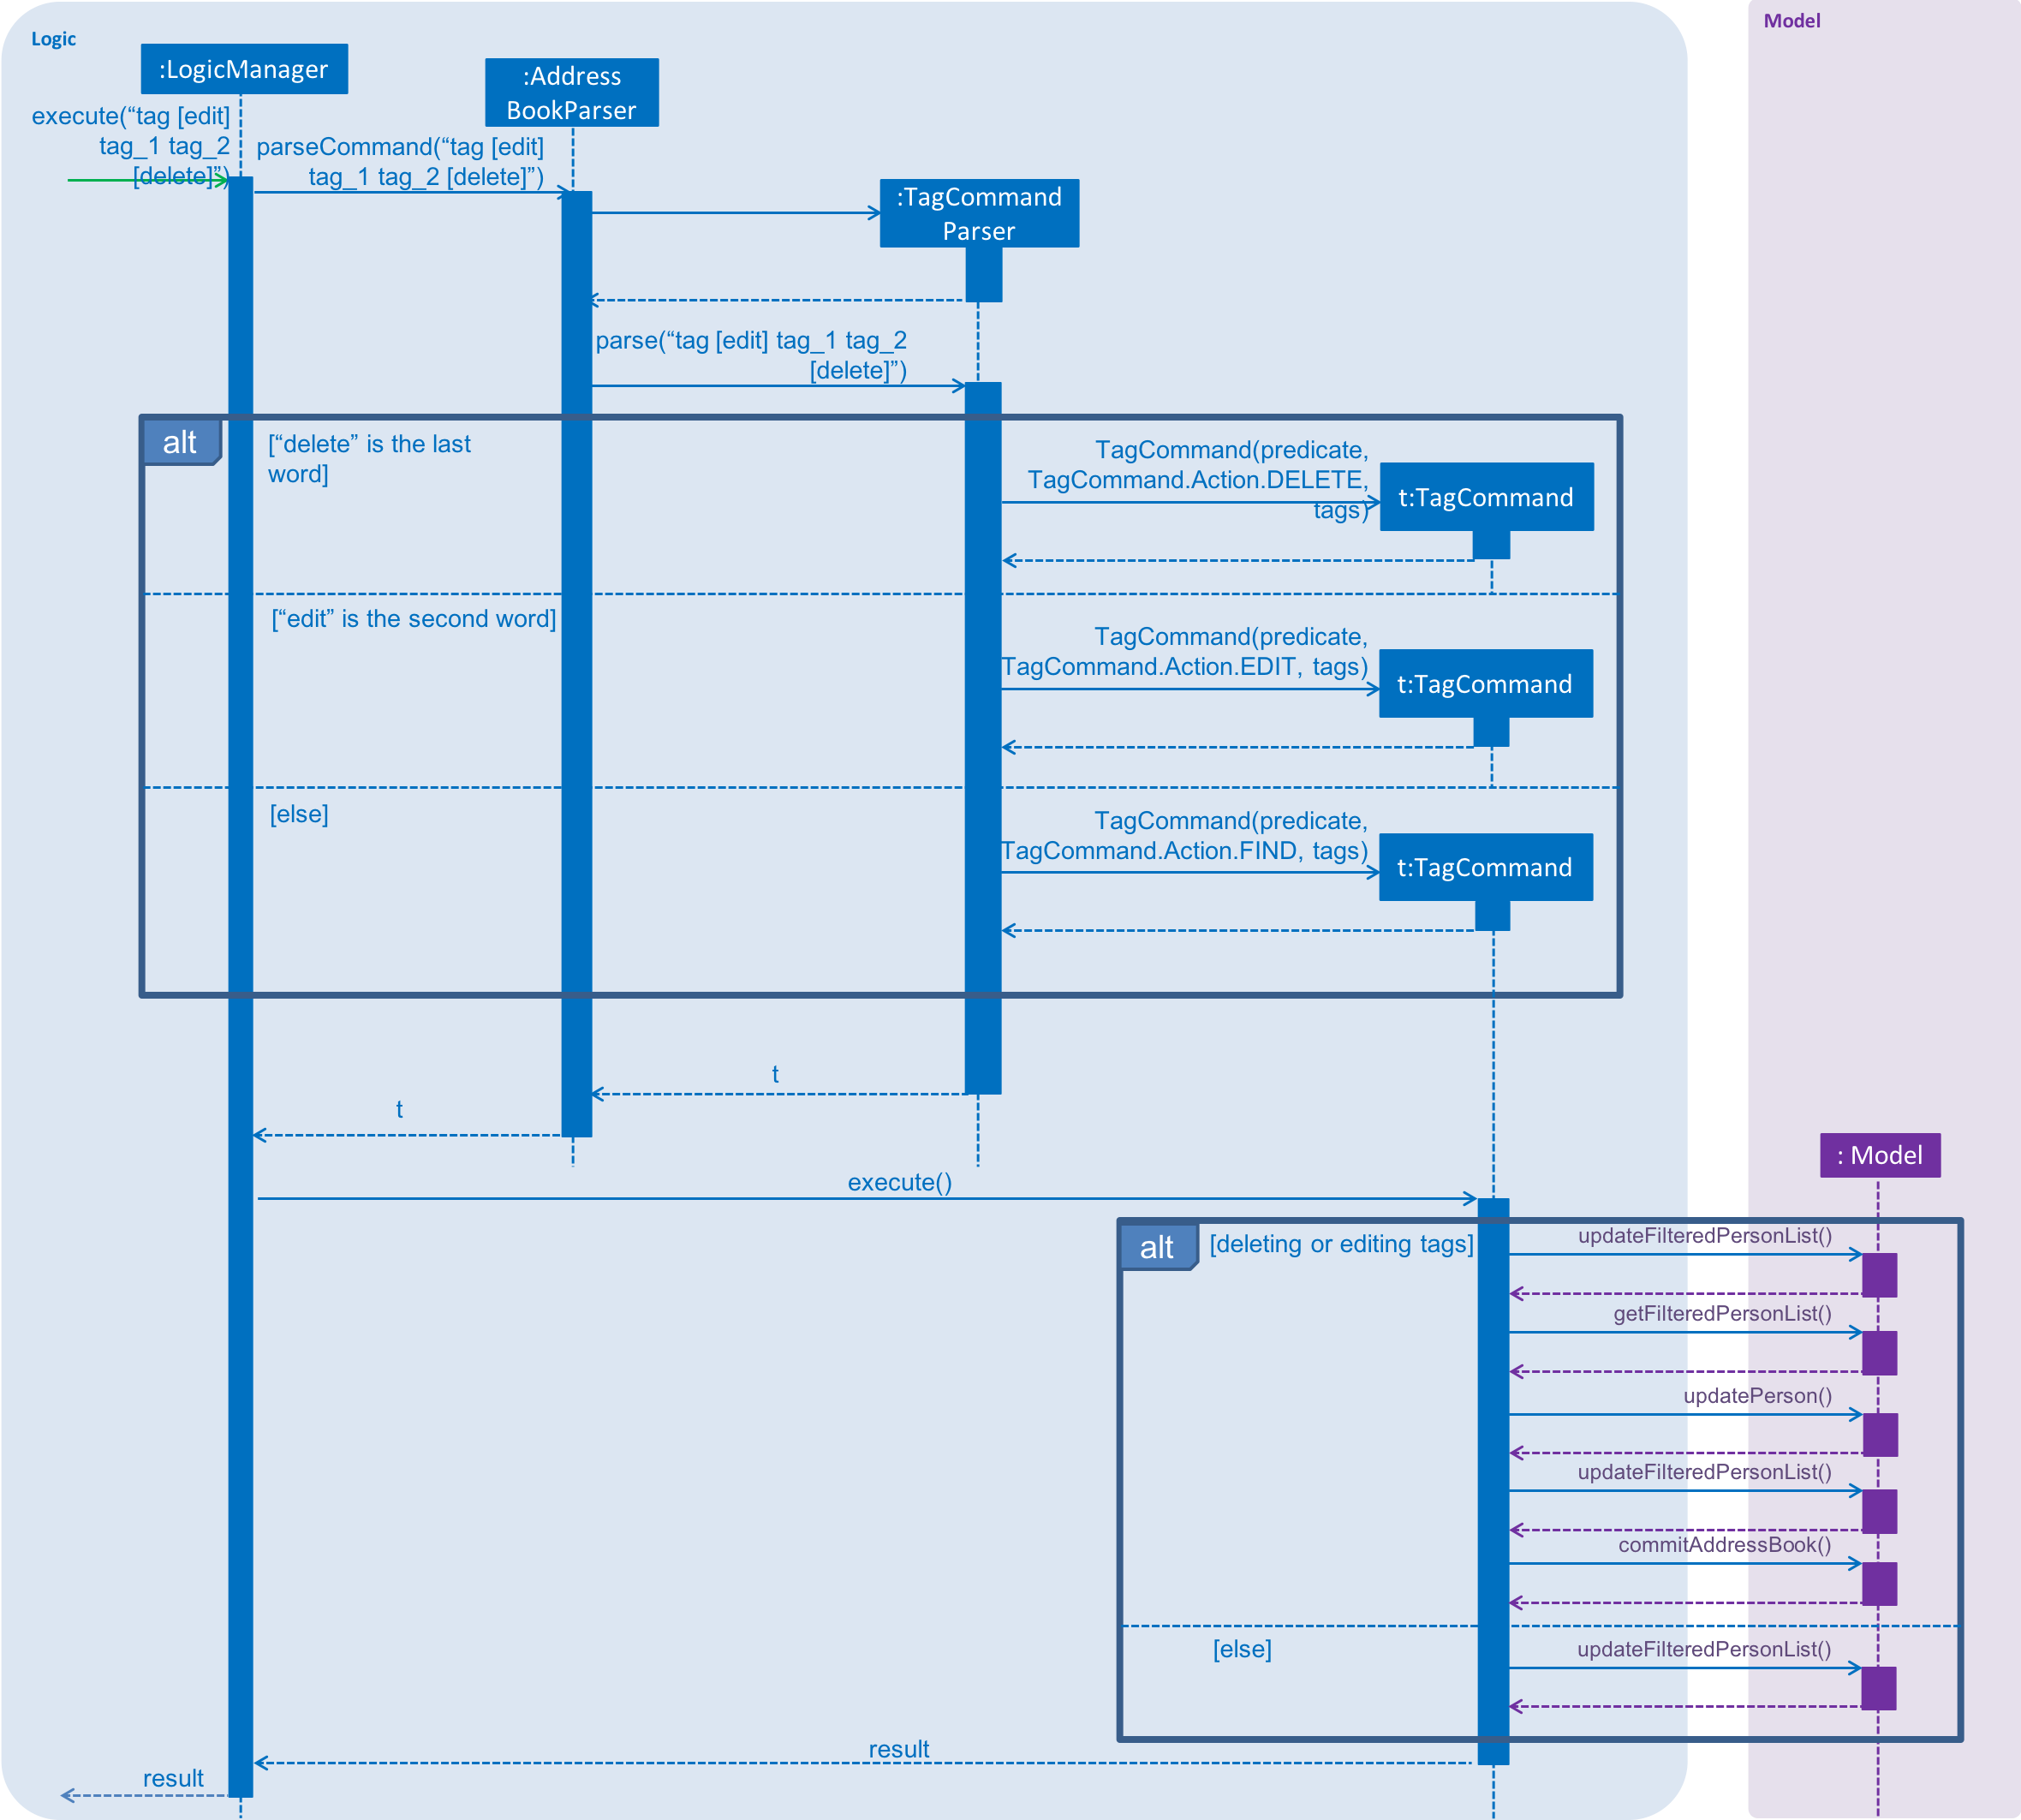
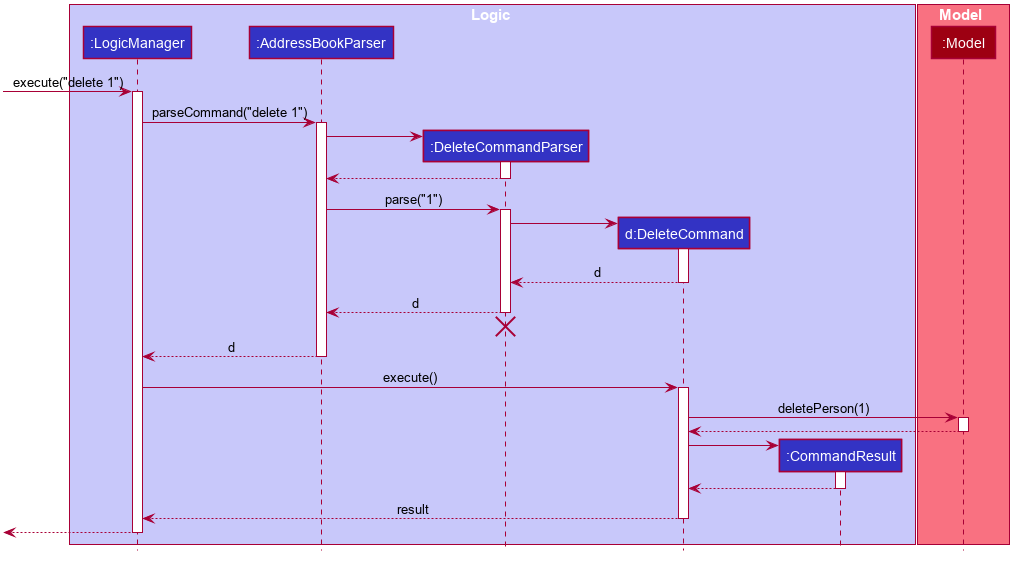
*Commandclasses). - Limit the scope of a diagram. Decide the purpose of the diagram (i.e., what does it help to explain?) and omit details not related to it. In particular, avoid showing lower-level details of multiple components in the same diagram unless strictly necessary e.g., note how the this sequence diagram shows only the detailed interactions within the Logic component i.e., does not show detailed interactions within the model component.
- Break diagrams into smaller fragments when possible.
- If a component has a lot of classes, consider further dividing into sub-components (e.g., a Parser sub-component inside the Logic component). After that, sub-components can be shown as black-boxes in the main diagram and their details can be shown as separate diagrams.
- You can use
refframes to break sequence diagrams to multiple diagrams. Similarly,rakes can be used to divide activity diagrams.
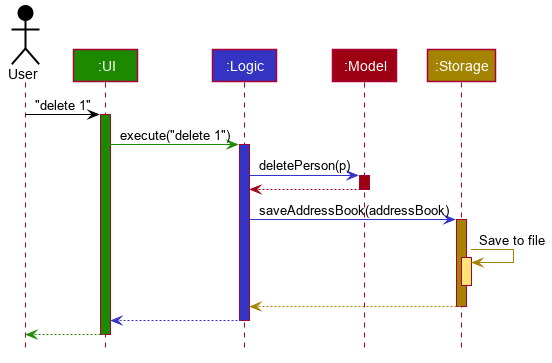
- Stay at the highest level of abstraction possible e.g., note how this sequence diagram shows only the interactions between architectural components, abstracting away the interactions that happen inside each component.
- Use visual representations as much as possible. E.g., show associations and navigabilities using lines and arrows connecting classes, rather than adding a variable in one of the classes.
- For some more examples, see here.
- Omit less important details. Examples:
- Integrate diagrams into the description. Place the diagram close to where it is being described.
- Use code snippets sparingly. The more you use code snippets in the DG, and longer the code snippet, the higher the risk of it getting outdated quickly. Instead, use code snippets only when necessary and cite only the strictly relevant parts only.
- Resize diagrams so that the text size in the diagram matches the the text size of the main text of the diagram. See example.
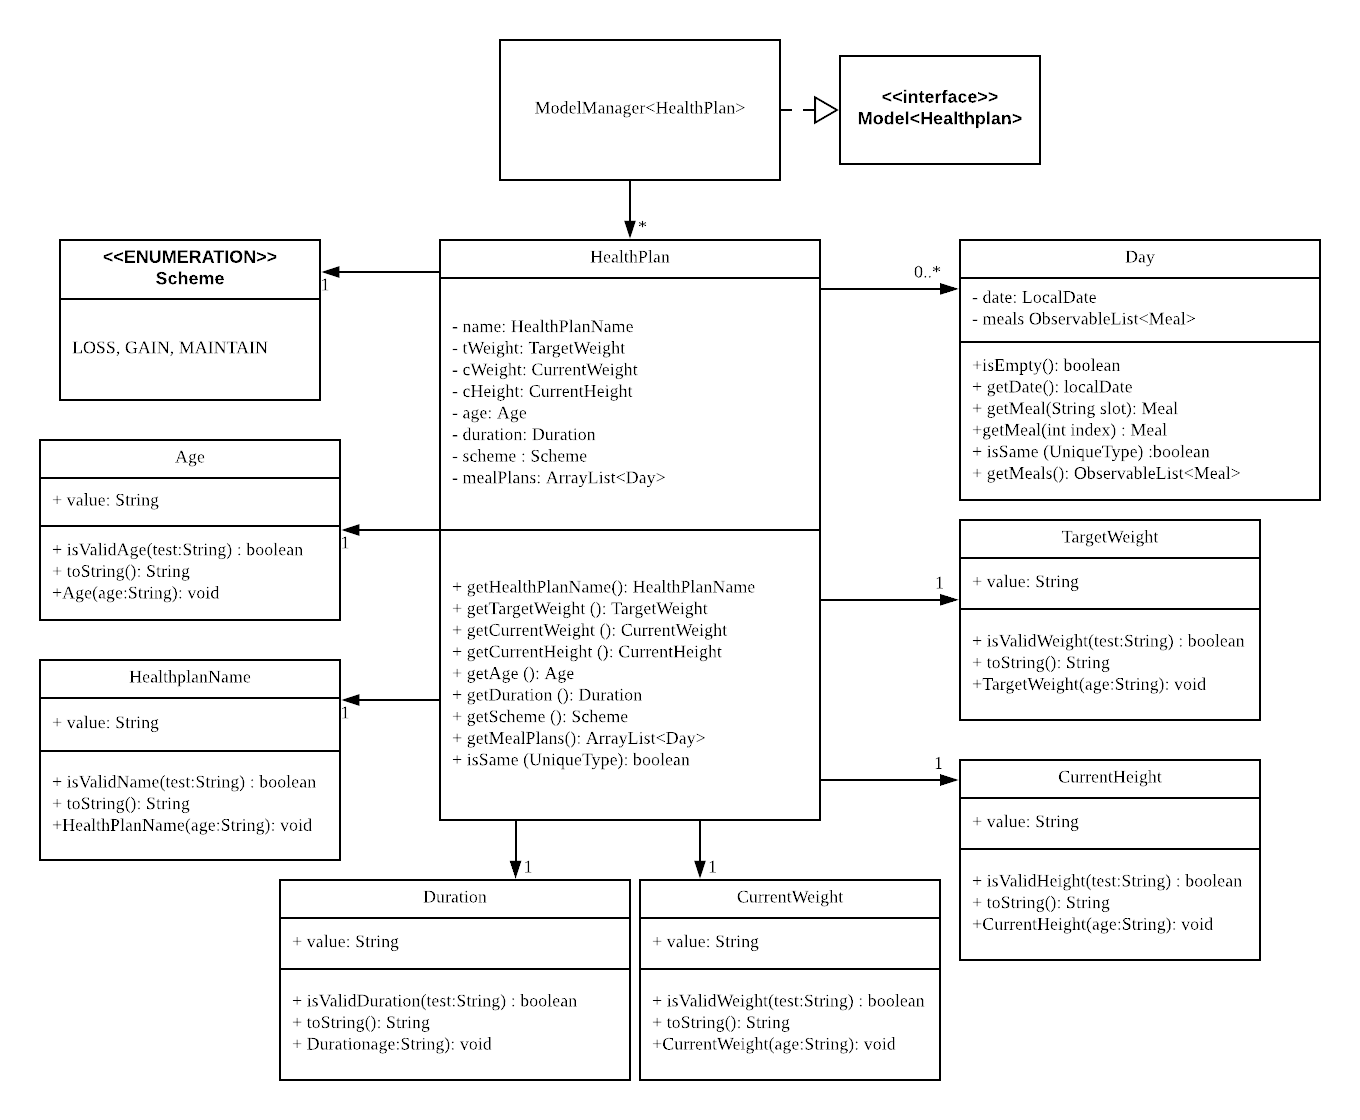
These class diagrams seem to have lot of member details, which can get outdated pretty quickly:
This class diagram seems to have too many classes:

These sequence diagrams are bordering on 'too complicated':
In this negative example, the text size in the diagram is much bigger than the text size used by the document:

It will look more 'polished' if the two text sizes match.

delete command
Deliverable: Product Website
Website README
- Ensure the
Ui.pngmatches the current product
Some common sense tips for a good product screenshot
Ui.png represents your product in its full glory.
- Before taking the screenshot, populate the product with data that makes the product look good. For example,
- If the product is supposed to show photos, use real photos instead of dummy placeholders.
- If the product doesn't have nice line wrapping for long inputs/outputs, don't use such inputs/outputs for the screenshot.
- It should show a state in which the product is well-populated i.e., don't leave data panels largely blank
- Choose a state that showcase the main features of the product i.e., the login screen is not usually a good choice
- Take a clean screenshot with a decent resolution. Some screenshot tools can capture a specified window only. If your tool cannot do that, make sure you crop away the extraneous parts captured by the screenshot.
- Avoid annotations (arrows, callouts, explanatory text etc.); it should look like the product is in use for real.
Examples
Reason: Distracting annotations.

Reason: Not enough data.

Reason: screenshot not cropped cleanly (contains extra background details)


Website AboutUs Page
- Use a suitable profile photo.
The purpose of the profile photo is for the teaching team to identify you. Therefore, choose a recent individual photo showing your face clearly (i.e., not too small) -- somewhat similar to a passport photo. Some examples can be seen in the 'Teaching team' page. Given below are some examples of good and bad profile photos.

If you are uncomfortable posting your photo due to security reasons, you can post a lower resolution image so that it is hard for someone to misuse that image for fraudulent purposes. If you are concerned about privacy, you may use a placeholder image in place of the photo in module-related documents that are publicly visible.
- Include a link to each person's PPP page.
- Team member names match full names used by LumiNUS.
Website UG (Web Page)
- Should match the submitted PDF file.
Website DG (Web Page)
- Should match the submitted PDF file.
Deliverable: Project Portfolio Page (PPP)
At the end of the project each student is required to submit a Project Portfolio Page.
PPP Objectives
- For you to use (e.g. in your resume) as a well-documented data point of your SE experience
- For evaluators to use as a data point to evaluate your project contributions
PPP Sections to include
- Overview: A short overview of your product to provide some context to the reader. The opening 1-2 sentences may be reused by all team members. If your product overview extends beyond 1-2 sentences, the remainder should be written by yourself.
- Summary of Contributions --Suggested items to include:
- Code contributed: Give a link to your code on tP Code Dashboard. The link is available in the Project List Page -- linked to the icon under your photo.
- Enhancements implemented: A summary of the enhancements you implemented.
- Contributions to documentation: Which sections did you contribute to the UG?
- Contributions to the DG: Which sections did you contribute to the DG? Which UML diagrams did you add/updated?
- Contributions to team-based tasks :
- Review/mentoring contributions: Links to PRs reviewed, instances of helping team members in other ways
- Contributions beyond the project team:
- Evidence of helping others e.g. responses you posted in our forum, bugs you reported in other team's products,
- Evidence of technical leadership e.g. sharing useful information in the forum
Team-tasks are the tasks that someone in the team has to do. Marks allocated to team-tasks will be divided among team members based on how much each member contributed to those tasks.
Examples of team-tasks
Here is a non-exhaustive list of team-tasks:
- Necessary general code enhancements e.g.,
- Work related to renaming the product
- Work related to changing the product icon
- Morphing the product into a different product
- Setting up the GitHub, Travis, AppVeyor, etc.
- Maintaining the issue tracker
- Release management
- Updating user/developer docs that are not specific to a feature e.g. documenting the target user profile
- Incorporating more useful tools/libraries/frameworks into the product or the project workflow (e.g. automate more aspects of the project workflow using a GitHub plugin)
Keep in mind that evaluators will use the PPP to estimate your project effort. We recommend that you mention things that will earn you a fair score e.g., explain how deep the enhancement is, why it is complete, how hard it was to implement etc..
-
[Optional] Contributions to the User Guide (Extracts): Reproduce the parts in the User Guide that you wrote. This can include features you implemented as well as features you propose to implement.
The purpose of allowing you to include proposed features is to provide you more flexibility to show your documentation skills. e.g. you can bring in a proposed feature just to give you an opportunity to use a UML diagram type not used by the actual features. -
[Optional] Contributions to the Developer Guide (Extracts): Reproduce the parts in the Developer Guide that you wrote. Ensure there is enough content to evaluate your technical documentation skills and UML modelling skills. You can include descriptions of your design/implementations, possible alternatives, pros and cons of alternatives, etc.
-
[Optional] If you plan to use the PPP in your Resume, you can also include your SE work outside of the module (will not be graded).
PPP Format
-
File name:
docs/team/githbub_username_in_lower_case.adoce.g.,docs/team/goodcoder123.adoc -
Follow the example in the AddressBook-Level3
-
You can use the Asciidoc's
includefeature to include sections from the developer guide or the user guide in your PPP. Follow the example in the sample.
PPP Page Limit
| Content | Recommended | Hard Limit |
|---|---|---|
| Overview + Summary of contributions | 0.5-1 | 2 |
| [Optional] Contributions to the User Guide | 1-3 | |
| [Optional] Contributions to the Developer Guide | 3-6 |
- The page limits given above are after converting to PDF format. The actual amount of content you require is actually less than what these numbers suggest because the HTML → PDF conversion adds a lot of spacing around content.
Deliverable: UML Diagrams
Owing to the changes in the module deliverables due to COVID-19, you are now required to submit a file containing the UML diagrams.
This is in addition to the documents that you (normally) submit for your project.
UML Objectives
- For you to demonstrate your ability to draw and explain UML diagrams in the context of your product's design.
UML Sections to include
- Each of you should submit one PDF file with the UML diagrams you contributed to the documentation. This can be extracted from your DG.
- Ensure you include a brief description of the UML and how it fits into your product.
UML Page Limit
- Maximum 3 pages.
Deliverable: Demo
Due to the COVID-19 situation, this deliverable has been changed as follows:
- Record a demo of all the product features, in a reasonable order.
- You may choose to screen record each feature and tie it up (see "Tools" below for options), OR
- Schedule + record a zoom meeting within the team, where you share your screens and do the demo.
- [Important] Choose the easiest method to record your demo.
- Don't waste time unnecessarily on editing and perfecting your recording.
- The idea here is to look at your product demo, not your video editing skills.
- Just ensure that your entire product window is visible and you are audible in the demo.
- Annotations and other enhancements to the video are not encouraged, unless absolutely necessary (those will not earn any extra marks)
- File name and format: The filename should be of the form
[TEAM_ID][product Name].mp4e.g.[CS2103T-W12-1][Contacts Plus].mp4- Submit MP4 files as they can be viewed on most OS'es. OS'es).
- File size: Recommended to keep below 200Mb. You can use a low resolution as long as the video is in usable quality.
- Submission: Submit to LumiNUS (a different folder will be setup).
- Deadline: Thursday 16th April 23.59 (i.e., 3 days after the main deadline)
- Tools:
- Also refer to info given below.
Demo Duration
- Strictly 18 minutes for a 5-person team, 15 minutes for a 4-person team, 21 minutes for a 6-person team. Exceeding this limit will be penalized.
Demo Target audience
- Assume you are giving a demo to a higher-level manager of your company, to brief him/her on the current capabilities of the product. This is the first time they are seeing the new product you developed but they are familiar with the AddressBook-level3 (AB3) product. The actual audience are the evaluators (the team supervisor and another tutor).
Demo Scope
- Start by giving an overview of the product so that the evaluators get a sense of the full picture early. Include the following:
- What is it? e.g., FooBar is a product to ensure the user takes frequent standing-breaks while working.
- Who is it for? e.g., It is for someone who works at a PC, prefers typing, and wants to avoid prolonged periods of sitting.
- How does it help? Give an overview of how the product's features help to solve the target problem for the target user
Here is an example:
Hi, welcome to the demo of our product FooBar. It is a product to ensure the user takes
frequent standing-breaks while working.
It is for someone who works at a PC, prefers typing, and wants to avoid prolonged periods
of sitting.
The user first sets the parameters such as frequency and targets, and then enters a
command to record the start of the sitting time, ... The app shows the length of the
sitting periods, and alerts the user if ...
...
- Each person should do a fair share of the demo. However, it's OK for one member to does all the typing.
- There is no need for each person to demo their own work.
- Present the features in a reasonable order: Organize the demo to present a cohesive picture of the product as a whole, presented in a logical order.
- No need to cover design/implementation details as the manager is not interested in those details.
Demo Structure
- Demo the product using the same executable you submitted.
- Use a sufficient amount of
Mr aaais not a realistic person namerealistic demo data. e.g at least 20 data items. Trying to demo a product using just 1-2 sample data creates a bad impression.
Demo Tips
- Plan the demo to be in sync with the impression you want to create. For example, if you are trying to convince that the product is easy to use, show the easiest way to perform a task before you show the full command with all the bells and whistles.
- Showcase how the feature improves the user’s life rather than simply describe each feature.
- Rehearse the steps well and ensure you can do a smooth demo. Find a golden path and stick to it. Poor quality demos can affect your grade.
- Don’t waste time repeating things the target audience already knows. e.g. no need to say things like "We are students from NUS, SoC".
- No need to introduce next presenter at the end of your part Reason: to save time.
Demo Special circumstances
- If a significant feature was not merged on time: inform the tutor and get permission to show the unmerged feature using your own version of the code. Obviously, unmerged features earn much less marks than a merged equivalent but something is better than nothing.
Deliverable: Practical Exam Dry Run (PE-D)
PE-D Overview
What: The v1.3 is subjected to a round of peer acceptance/system testing, also called the Practical Exam (PE) Dry Run as this round of testing will be similar to the graded Practical Exam that will be done at v1.4.
When, where: uses a 40 minute slot at the start of week 11 lecture
PE Overview
Objectives:
- The primary objective of the PE is to increase the rigor of project grading. Assessing most aspects of the project involves an element subjectivity. As the project counts for 45% of the final grade, it is not prudent to rely on evaluations of tutors alone as there can be significant variations between how different tutors assess projects. That is why we collect more data points via the PE so as to minimize the chance of your project being affected by evaluator-bias.
- PE is also used to evaluate your manual testing skills, product evaluation skills, effort estimation skills etc.
- Note that significant project components are not graded solely based on peer ratings. Rather, PE data are mostly used to cross-validate tutors' grades and identify cases that need further investigation. When peer inputs are used for grading, they are usually combined with tutor evaluations with appropriate weight for each. In some cases ratings from team members are given a higher weight compared to ratings from other peers, if that is appropriate.
- Note that the PE is not a means of pitting you against each other. Developers and testers play for the same side; they need to push each other to improve the quality of their work -- not bring down each other.
Grading:
- Your performance in the practical exam will affect your final grade and your peers', as explained in Admin: Project Grading section.
- As such, we have put in measures to identify and penalize insincere/random evaluations.
- Also see:
Admin tP Grading → Notes on how marks are calculated for PE
PE Preparation
- It's similar to,
PE-D Preparation
-
Ensure that you have accepted the invitation to join the GitHub org used by the module. Go to https://github.com/nus-cs2103-AY1920S2 to accept the invitation.
-
Ensure you have access to a computer that is able to run module projects e.g. has the right Java version.
- Download the latest CATcher and ensure you can run it on your computer.
Issues created for PED and PE need to be in a precise format for our grading scripts to work. Incorrectly-formatted responses will have to discarded. Therefore, you are strongly recommended to use CATcher for PED and PE activities. If you want to give your response via GitHub instead, please get our permission first.
- Create a public repo in your GitHub account with the following name:
- PE Dry Run:
ped - PE:
pe
- PE Dry Run:
- Enable its issue tracker and add the following labels to it (the label names should be precisely as given).
Bug Severity labels:
severity.VeryLow: A flaw that is purely cosmetic and does not affect usage e.g., a typo/spacing/layout/color/font issues in the docs or the UI that doesn't affect usage.severity.Low: A flaw that is unlikely to affect normal operations of the product. Appears only in very rare situations and causes a minor inconvenience only.severity.Medium: A flaw that causes occasional inconvenience to some users but they can continue to use the product.severity.High: A flaw that affects most users and causes major problems for users. i.e., makes the product almost unusable for most users.
Type labels:
type.FunctionalityBug: A functionality does not work as specified/expected.type.FeatureFlaw: Some functionality missing from a feature delivered in v1.4 in a way that the feature becomes less useful to the intended target user for normal usage. i.e., the feature is not 'complete'. In other words, an acceptance testing bug that falls within the scope of v1.4 features. These issues are counted against the 'depth and completeness' of the feature.type.DocumentationBug: A flaw in the documentation that can potentially affect the user e.g., a missing step, a wrong instruction, typos that affect users
-
Have a good screen grab tool with annotation features so that you can quickly take a screenshot of a bug, annotate it, and post in the issue tracker.
- You can use Ctrl+V to paste a picture from the clipboard into a text box in bug report.
-
Download the product to be tested notifications are likely to go out on the morning of the PE/PE-D sessionafter you have been notified of which team you have been allocated to test.
-
Charge your computer before coming to the session. The testing venue might not have enough charging points.
PE Phase 1: Bug Reporting
PE Phase 1 is an 'exam', to be done under exam conditions:
- You are not allowed to communicate with others (except the invigilators).
- You are not allowed to share your work with others.
- Violators will be reported to the university for disciplinary action.
- When, where: Week 13 lecture
PE Phase 1 - Part I Product Testing [60 minutes]
- Test the product and report bugs as described below. You may report both product bugs and documentation bugs during this period.
Testing instructions for PE and PE-D
a) Launching the JAR file
- Put the jar file in an empty folder.
- Open a command window. Run the
java -versioncommand to ensure you are using Java 11. - Launch the jar file using the
java -jarcommand (do not use double-clicking). - If the product doesn't work at all: If the product fails catastrophically e.g., cannot even launch, you can test the fallback team allocated to you. But in this case you must inform us immediately after the session so that we can send your bug reports to the correct team.
- PE-D: Download the JAR file from their GitHub page
- PE: 1. Download from LumiNUS all files submitted by the team (i.e. jar file, User Guide, Developer Guide, and Project Portfolio Pages) into an empty folder.
b) What to test
- PE Dry Run (at v1.3):
- Test the product based on the User Guide (the UG is most likely accessible using the
helpcommand). - Do system testing first i.e., does the product work as specified by the documentation?. If there is time left, you can do acceptance testing as well i.e., does the product solve the problem it claims to solve?.
- Test the product based on the User Guide (the UG is most likely accessible using the
- PE (at v1.4):
- Test based on the Developer Guide (Appendix named Instructions for Manual Testing) and the User Guide. The testing instructions in the Developer Guide can provide you some guidance but if you follow those instructions strictly, you are unlikely to find many bugs. You can deviate from the instructions to probe areas that are more likely to have bugs.
- As before, do both system testing and acceptance testing but give priority to system testing as system-testing bugs can earn you more credit.
c) What bugs to report?
- PE Dry Run (at v1.3): You may report functionality bugs, UG bugs, and feature flaws.
Admin tP Grading → Functionality Bugs
Admin tP Grading → Functionality Bugs
Admin tP Grading → Possible UG Bugs
- PE (at v1.4): In addition to the reporting functionality bugs, UG bugs, and feature flaws, there will be an extra time given specifically for reporting documentation bugs (i.e., UG and DG bugs).
Admin tP Grading → Possible DG Bugs
- About posting suggestions:
- PE Dry Run (at v1.3): You can also post suggestions on how to improve the product. Be diplomatic when reporting bugs or suggesting improvements. For example, instead of criticising the current behavior, simply suggest alternatives to consider.
- PE (at v1.4): Do not post suggestions. But if a feature is missing a critical functionality that makes the feature less useful to the intended user, it can be reported as a bug of type
Type.FeatureFlaw.
d) How to report bugs
- Post bugs as you find them (i.e., do not wait to post all bugs at the end) because bug reports created/modified after the allocated time will not count.
- Launch CATcher, and login to the correct profile:
- PE Dry Run:
CS2103/T PE Dry run - PE:
CS2103/T PE
- PE Dry Run:
- Post bugs using CATcher.
- Post bug reports in the following repo you created earlier:
- PE Dry Run:
ped - PE:
pe
- PE Dry Run:
- The whole description of the bug should be in the issue description i.e., do not add comments to the issue.
e) Bug report format
- Each bug should be a separate issue.
- Write good quality bug reports; poor quality or incorrect bug reports will not earn credit.
- Use a descriptive title.
- Give a good description of the bug with steps to reproduce and screenshots. If the receiving team cannot reproduce the bug, you will not be able to get credit for it.
- Assign exactly one
severity.*label to the bug report. Bug report without a severity label are consideredseverity.Low(lower severity bugs earn lower credit)
Bug Severity labels:
severity.VeryLow: A flaw that is purely cosmetic and does not affect usage e.g., a typo/spacing/layout/color/font issues in the docs or the UI that doesn't affect usage.severity.Low: A flaw that is unlikely to affect normal operations of the product. Appears only in very rare situations and causes a minor inconvenience only.severity.Medium: A flaw that causes occasional inconvenience to some users but they can continue to use the product.severity.High: A flaw that affects most users and causes major problems for users. i.e., makes the product almost unusable for most users.
- Assign exactly one
type.*label to the issue.
Type labels:
type.FunctionalityBug: A functionality does not work as specified/expected.type.FeatureFlaw: Some functionality missing from a feature delivered in v1.4 in a way that the feature becomes less useful to the intended target user for normal usage. i.e., the feature is not 'complete'. In other words, an acceptance testing bug that falls within the scope of v1.4 features. These issues are counted against the 'depth and completeness' of the feature.type.DocumentationBug: A flaw in the documentation that can potentially affect the user e.g., a missing step, a wrong instruction, typos that affect users
PE Phase 1 - Part II Evaluating Documents [30 minutes]
- This slot is for reporting documentation bugs only. You may report bugs related to UG and DG.
- For each bug reported, cite evidence and justify. For example, if you think the explanation of a feature is too brief, explain what information is missing and why the omission hinders the reader.
Admin tP Grading → Possible UG Bugs
Admin tP Grading → Possible DG Bugs
PE Phase 1 - Part III Overall Evaluation [15 minutes]
- To be submitted via TEAMMATES. You are recommended to complete this during the PE session itself, but you have until the end of the day to submit (or revise) your submissions.
Important questions included in the evaluation:
Evaluate based on the User Guide and the actual product behavior.
| Criterion | Unable to judge | Low | Medium | High |
|---|---|---|---|---|
target user |
not specified | clearly specified and narrowed down appropriately | ||
value proposition |
not specified | The value to target user is low. App is not worth using | Some small group of target users might find the app worth using | Most of the target users are likely to find the app worth using |
optimized for target user |
Not enough focus for CLI users | Mostly CLI-based, but cumbersome to use most of the time | feels like a fast typist can be more productive with the app, compared to an equivalent GUI app without a CLI |
Evaluate based on fit-for-purpose, from the perspective of a target user.
For reference, the AB3 UG is here.
Evaluate based on fit-for-purpose from the perspective of a new team member trying to understand the product's internal design by reading the DG.
For reference, the AB3 DG is here.
0..30] e.g., if you give 8, that means the team's effort is about 80% of that spent on creating AB3. We expect most typical teams to score near to 10.
- Do read the DG appendix named
Effort, if any. - Consider implementation work only (i.e., exclude testing, documentation, project management etc.)
- Do not give a high value just to be nice. Your responses will be used to evaluate your effort estimation skills.
PE Phase 2: Developer Response
This phase is for you to respond to the bug reports you received.
Duration: The review period will start around 1 day after the PE (exact time to be announced) and will last until the following Monday midnight (within 3 days). However, you are recommended to finish this task ASAP, to minimize cutting into your exam preparation work.
Bug reviewing is recommended to be done as a team as some of the decisions need team consensus.
Instructions for Reviewing Bug Reports
- Don't freak out if there are lot of bug reports. Many can be duplicates and some can be false positives. In any case, we anticipate that all of these products will have some bugs and our penalty for bugs is not harsh. Furthermore, it depends on the severity of the bug. Some bug may not even be penalized.
- CATcher does not come with a UG, but the UI is fairly intuitive (there are tool tips too). Do post in the forum if you need any guidance with its usage.
- Also note that CATcher hasn't been battle-tested for this phase, in particular, w.r.t. multiple team members editing the same issue concurrently. It is ideal if the team members get together and work through the issues together. If you think others might be editing the same issues at the same time, use the
Syncbutton at the top to force-sync your view with the latest data from GitHub.
CS2103/T PE. It will show all the bugs assigned to your team, divided into three sections:
Issues Pending Responses- Issues that your team has not processed yet.Issues Responded- Your job is to get all issues to the second category.Faulty Issues- e.g., Bugs marked as duplicates of each other, or causing circular duplicate relationships. Fix the problem given so that no issues remain in this category.
You must use CATcher. You are strictly prohibited from editing PE bug reports using the GitHub Web interface as it can can render bug reports unprocessable by CATcher, sometimes in an irreversible ways, and can affect the entire class. Please contact the prof if you are unable to use CATcher for some reason.
- If a bug seems to be for a different product (i.e. wrongly assigned to your team), let us know ASAP.
- If the bug is reported multiple times,
- Mark all copies EXCEPT one as duplicates of the one left out (let's call that one the original) using the
duplicatetag. - If the duplicates have different severity levels, you should keep the one with the highest severity as the original. But you can downgrade the severity of the original or the duplicates.
- For each group of duplicates, all duplicates should point to one original i.e., no multiple levels of duplicates, and no cyclical duplication relationships.
- If the duplication status is eventually accepted, all duplicates will be assumed to have inherited the
type.*andseverity.*from the original.
- Mark all copies EXCEPT one as duplicates of the one left out (let's call that one the original) using the
- Apply exactly one of these labels (if missing, we assign:
response.Accepted)
Response Labels:
response.Accepted: You accept it as a bug.response.NotInScope: It is a valid issue but not something the team should be penalized for e.g., it was not related to features delivered in v1.4.response.Rejected: What tester treated as a bug is in fact the expected behavior. You can reject bugs that you inherited from AB3.response.CannotReproduce: You are unable to reproduce the behavior reported in the bug after multiple tries.response.IssueUnclear: The issue description is not clear. Don't post comments asking the tester to give more info. The tester will not be able to see those comments because the bug reports are anonymous.
- Apply exactly one of these labels (if missing, we assign:
type.FunctionalityBug)
Type labels:
type.FunctionalityBug: A functionality does not work as specified/expected.type.FeatureFlaw: Some functionality missing from a feature delivered in v1.4 in a way that the feature becomes less useful to the intended target user for normal usage. i.e., the feature is not 'complete'. In other words, an acceptance testing bug that falls within the scope of v1.4 features. These issues are counted against the 'depth and completeness' of the feature.type.DocumentationBug: A flaw in the documentation that can potentially affect the user e.g., a missing step, a wrong instruction, typos that affect users
- If you disagree with the original severity assigned to the bug, you may change it to the correct level.
Bug Severity labels:
severity.VeryLow: A flaw that is purely cosmetic and does not affect usage e.g., a typo/spacing/layout/color/font issues in the docs or the UI that doesn't affect usage.severity.Low: A flaw that is unlikely to affect normal operations of the product. Appears only in very rare situations and causes a minor inconvenience only.severity.Medium: A flaw that causes occasional inconvenience to some users but they can continue to use the product.severity.High: A flaw that affects most users and causes major problems for users. i.e., makes the product almost unusable for most users.
- Decide who should fix the bug. Use the
Assigneesfield to assign the issue to that person(s). There is no need to actually fix the bug though. It's simply an indication/acceptance of responsibility. If there is no assignee, we will distribute the penalty for that bug (if any) among all team members.- If it is not easy to decide the assignee(s), we recommend (but not enforce) that the feature owner should be assigned bugs related to the feature, Reason: The feature owner should have defended the feature against bugs using automated tests and defensive coding techniques.
- It is expected that PR reviewers will take part of the responsibilities if they were given a reasonable time to review the PR (even if they never review it), provided the bug should have been reasonably apparent to a reviewer. For example, if someone put up a PR for review but merged it un-reviewed after two days because no one bothered to review it, it's only fair that the whole team (or whoever was assigned to review the PR) take a share of the blame.
-
As far as possible, choose the correct
type.*,severity.*, and assignees even for bugs you are not accepting or for bugs that are marked as duplicates. Reason: your non-acceptance or duplication status may be rejected in a later phase, in which case we need to grade it as an accepted/non-duplicate bug. -
Justify your response. For all of the following cases, you must add a comment justifying your stance. Testers will get to respond to all those cases and will be double-checked by the teaching team in later phases. Indiscriminate/unreasonable dev/tester responses, if deemed as a case of trying to game the system, will be penalized.
- downgrading severity
- non-acceptance of a bug
- changing the bug type
- non-obvious duplicate
PE Phase 3: Tester Response
- In this phase you will get to state whether you agree or disagree with the dev response to the bugs you reported. If a bug reported has been subjected to any of the below by the receiving team, you can record your objections and the reason for the objection.
- not accepted
- severity downgraded
- bug type changed
- As before, consider carefully before you object to a team's response. If many of your objections were overruled by the teaching team later, you will lose marks for not being able to evaluate a bug report properly.
- This phase is optional. If you do not respond to a dev response, we'll assume that you agree with it.
- Deadline: Reading week Thursday 2359 (within 2 days)
- Procedure:
- When the phase has been announced as open, login to CATcher as usual (profile:
CS2103/T PE). - For the issues listed, go to the details, and read the team's response.
- If you disagree with any of the items listed, tick on the
I disagreetick box and enter your justification for the disagreement, and clickSave.
You must use CATcher. You are strictly prohibited from editing PE bug reports using the GitHub Web interface as it can can render bug reports unprocessable by CATcher, sometimes in an irreversible ways, and can affect the entire class. Please contact the prof if you are unable to use CATcher for some reason.
PE Phase 4: Tutor Moderation
- In this phase tutors will look through all dev responses you objected to in the previous phase and decide on a final outcome.
- In the unlikely we need your inputs, the tutor will contact you.
Grading: Taking part in the PE dry run is strongly encouraged as it can affect your grade in the following ways.
- If the product you are allocated to test in the Practical Exam (at v1.4) had a very low bug count, we will consider your performance in PE dry run as well when grading the PE.
- PE dry run will help you practice for the actual PE.
- Taking part in the PE dry run will earn you participation points.
- There is no penalty for bugs reported in your product. Every bug you find is a win-win for you and the team whose product you are testing.
Why:
- To train you to do manual testing, bug reporting, bug assigning of priority ordertriaging, bug fixing, communicating with users/testers/developers, evaluating products etc.
- To help you improve your product before the final submission.
PE-D Preparation
-
Ensure that you have accepted the invitation to join the GitHub org used by the module. Go to https://github.com/nus-cs2103-AY1920S2 to accept the invitation.
-
Ensure you have access to a computer that is able to run module projects e.g. has the right Java version.
- Download the latest CATcher and ensure you can run it on your computer.
Issues created for PED and PE need to be in a precise format for our grading scripts to work. Incorrectly-formatted responses will have to discarded. Therefore, you are strongly recommended to use CATcher for PED and PE activities. If you want to give your response via GitHub instead, please get our permission first.
- Create a public repo in your GitHub account with the following name:
- PE Dry Run:
ped - PE:
pe
- PE Dry Run:
- Enable its issue tracker and add the following labels to it (the label names should be precisely as given).
Bug Severity labels:
severity.VeryLow: A flaw that is purely cosmetic and does not affect usage e.g., a typo/spacing/layout/color/font issues in the docs or the UI that doesn't affect usage.severity.Low: A flaw that is unlikely to affect normal operations of the product. Appears only in very rare situations and causes a minor inconvenience only.severity.Medium: A flaw that causes occasional inconvenience to some users but they can continue to use the product.severity.High: A flaw that affects most users and causes major problems for users. i.e., makes the product almost unusable for most users.
Type labels:
type.FunctionalityBug: A functionality does not work as specified/expected.type.FeatureFlaw: Some functionality missing from a feature delivered in v1.4 in a way that the feature becomes less useful to the intended target user for normal usage. i.e., the feature is not 'complete'. In other words, an acceptance testing bug that falls within the scope of v1.4 features. These issues are counted against the 'depth and completeness' of the feature.type.DocumentationBug: A flaw in the documentation that can potentially affect the user e.g., a missing step, a wrong instruction, typos that affect users
-
Have a good screen grab tool with annotation features so that you can quickly take a screenshot of a bug, annotate it, and post in the issue tracker.
- You can use Ctrl+V to paste a picture from the clipboard into a text box in bug report.
-
Download the product to be tested notifications are likely to go out on the morning of the PE/PE-D sessionafter you have been notified of which team you have been allocated to test.
-
Charge your computer before coming to the session. The testing venue might not have enough charging points.
PE-D During the session
Testing instructions for PE and PE-D
a) Launching the JAR file
- Put the jar file in an empty folder.
- Open a command window. Run the
java -versioncommand to ensure you are using Java 11. - Launch the jar file using the
java -jarcommand (do not use double-clicking). - If the product doesn't work at all: If the product fails catastrophically e.g., cannot even launch, you can test the fallback team allocated to you. But in this case you must inform us immediately after the session so that we can send your bug reports to the correct team.
- PE-D: Download the JAR file from their GitHub page
- PE: 1. Download from LumiNUS all files submitted by the team (i.e. jar file, User Guide, Developer Guide, and Project Portfolio Pages) into an empty folder.
b) What to test
- PE Dry Run (at v1.3):
- Test the product based on the User Guide (the UG is most likely accessible using the
helpcommand). - Do system testing first i.e., does the product work as specified by the documentation?. If there is time left, you can do acceptance testing as well i.e., does the product solve the problem it claims to solve?.
- Test the product based on the User Guide (the UG is most likely accessible using the
- PE (at v1.4):
- Test based on the Developer Guide (Appendix named Instructions for Manual Testing) and the User Guide. The testing instructions in the Developer Guide can provide you some guidance but if you follow those instructions strictly, you are unlikely to find many bugs. You can deviate from the instructions to probe areas that are more likely to have bugs.
- As before, do both system testing and acceptance testing but give priority to system testing as system-testing bugs can earn you more credit.
c) What bugs to report?
- PE Dry Run (at v1.3): You may report functionality bugs, UG bugs, and feature flaws.
Admin tP Grading → Functionality Bugs
Admin tP Grading → Functionality Bugs
Admin tP Grading → Possible UG Bugs
- PE (at v1.4): In addition to the reporting functionality bugs, UG bugs, and feature flaws, there will be an extra time given specifically for reporting documentation bugs (i.e., UG and DG bugs).
Admin tP Grading → Possible DG Bugs
- About posting suggestions:
- PE Dry Run (at v1.3): You can also post suggestions on how to improve the product. Be diplomatic when reporting bugs or suggesting improvements. For example, instead of criticising the current behavior, simply suggest alternatives to consider.
- PE (at v1.4): Do not post suggestions. But if a feature is missing a critical functionality that makes the feature less useful to the intended user, it can be reported as a bug of type
Type.FeatureFlaw.
d) How to report bugs
- Post bugs as you find them (i.e., do not wait to post all bugs at the end) because bug reports created/modified after the allocated time will not count.
- Launch CATcher, and login to the correct profile:
- PE Dry Run:
CS2103/T PE Dry run - PE:
CS2103/T PE
- PE Dry Run:
- Post bugs using CATcher.
- Post bug reports in the following repo you created earlier:
- PE Dry Run:
ped - PE:
pe
- PE Dry Run:
- The whole description of the bug should be in the issue description i.e., do not add comments to the issue.
e) Bug report format
- Each bug should be a separate issue.
- Write good quality bug reports; poor quality or incorrect bug reports will not earn credit.
- Use a descriptive title.
- Give a good description of the bug with steps to reproduce and screenshots. If the receiving team cannot reproduce the bug, you will not be able to get credit for it.
- Assign exactly one
severity.*label to the bug report. Bug report without a severity label are consideredseverity.Low(lower severity bugs earn lower credit)
Bug Severity labels:
severity.VeryLow: A flaw that is purely cosmetic and does not affect usage e.g., a typo/spacing/layout/color/font issues in the docs or the UI that doesn't affect usage.severity.Low: A flaw that is unlikely to affect normal operations of the product. Appears only in very rare situations and causes a minor inconvenience only.severity.Medium: A flaw that causes occasional inconvenience to some users but they can continue to use the product.severity.High: A flaw that affects most users and causes major problems for users. i.e., makes the product almost unusable for most users.
- Assign exactly one
type.*label to the issue.
Type labels:
type.FunctionalityBug: A functionality does not work as specified/expected.type.FeatureFlaw: Some functionality missing from a feature delivered in v1.4 in a way that the feature becomes less useful to the intended target user for normal usage. i.e., the feature is not 'complete'. In other words, an acceptance testing bug that falls within the scope of v1.4 features. These issues are counted against the 'depth and completeness' of the feature.type.DocumentationBug: A flaw in the documentation that can potentially affect the user e.g., a missing step, a wrong instruction, typos that affect users
At the end of the project each student is required to submit a Project Portfolio Page.
PPP Objectives
- For you to use (e.g. in your resume) as a well-documented data point of your SE experience
- For evaluators to use as a data point to evaluate your project contributions
PPP Sections to include
- Overview: A short overview of your product to provide some context to the reader. The opening 1-2 sentences may be reused by all team members. If your product overview extends beyond 1-2 sentences, the remainder should be written by yourself.
- Summary of Contributions --Suggested items to include:
- Code contributed: Give a link to your code on tP Code Dashboard. The link is available in the Project List Page -- linked to the icon under your photo.
- Enhancements implemented: A summary of the enhancements you implemented.
- Contributions to documentation: Which sections did you contribute to the UG?
- Contributions to the DG: Which sections did you contribute to the DG? Which UML diagrams did you add/updated?
- Contributions to team-based tasks :
- Review/mentoring contributions: Links to PRs reviewed, instances of helping team members in other ways
- Contributions beyond the project team:
- Evidence of helping others e.g. responses you posted in our forum, bugs you reported in other team's products,
- Evidence of technical leadership e.g. sharing useful information in the forum
Team-tasks are the tasks that someone in the team has to do. Marks allocated to team-tasks will be divided among team members based on how much each member contributed to those tasks.
Examples of team-tasks
Here is a non-exhaustive list of team-tasks:
- Necessary general code enhancements e.g.,
- Work related to renaming the product
- Work related to changing the product icon
- Morphing the product into a different product
- Setting up the GitHub, Travis, AppVeyor, etc.
- Maintaining the issue tracker
- Release management
- Updating user/developer docs that are not specific to a feature e.g. documenting the target user profile
- Incorporating more useful tools/libraries/frameworks into the product or the project workflow (e.g. automate more aspects of the project workflow using a GitHub plugin)
Keep in mind that evaluators will use the PPP to estimate your project effort. We recommend that you mention things that will earn you a fair score e.g., explain how deep the enhancement is, why it is complete, how hard it was to implement etc..
-
[Optional] Contributions to the User Guide (Extracts): Reproduce the parts in the User Guide that you wrote. This can include features you implemented as well as features you propose to implement.
The purpose of allowing you to include proposed features is to provide you more flexibility to show your documentation skills. e.g. you can bring in a proposed feature just to give you an opportunity to use a UML diagram type not used by the actual features. -
[Optional] Contributions to the Developer Guide (Extracts): Reproduce the parts in the Developer Guide that you wrote. Ensure there is enough content to evaluate your technical documentation skills and UML modelling skills. You can include descriptions of your design/implementations, possible alternatives, pros and cons of alternatives, etc.
-
[Optional] If you plan to use the PPP in your Resume, you can also include your SE work outside of the module (will not be graded).
PPP Format
-
File name:
docs/team/githbub_username_in_lower_case.adoce.g.,docs/team/goodcoder123.adoc -
Follow the example in the AddressBook-Level3
-
You can use the Asciidoc's
includefeature to include sections from the developer guide or the user guide in your PPP. Follow the example in the sample.
PPP Page Limit
| Content | Recommended | Hard Limit |
|---|---|---|
| Overview + Summary of contributions | 0.5-1 | 2 |
| [Optional] Contributions to the User Guide | 1-3 | |
| [Optional] Contributions to the Developer Guide | 3-6 |
- The page limits given above are after converting to PDF format. The actual amount of content you require is actually less than what these numbers suggest because the HTML → PDF conversion adds a lot of spacing around content.
PE-D After the session
- We'll transfer the relevant bug reports to your repo over the weekend. Once you have received the bug reports for your product, it is up to you to decide whether you will act on reported issues before the final submission v1.4. For some issues, the correct decision could be to reject or postpone to a version beyond v1.4.
- If you have received bug reports that don't seem to be about your project, do let us know ASAP (email the prof).
- You can navigate to the original bug report (via the back-link provided in the bug report given to you) and post in that issue thread to communicate with the tester who reported the bug e.g. to ask for more info, etc. However, the tester is not obliged to respond.
- Do not argue with the bug reporter to try to convince that person that your way is correct/better. If at all, you can gently explain the rationale for the current behavior but do not waste time getting involved in long arguments. If you think the suggestion/bug is unreasonable, just thank the reporter for their view and discontinue to discussion.
Deliverable: Practical Exam (PE)
PE Overview
Objectives:
- The primary objective of the PE is to increase the rigor of project grading. Assessing most aspects of the project involves an element subjectivity. As the project counts for 45% of the final grade, it is not prudent to rely on evaluations of tutors alone as there can be significant variations between how different tutors assess projects. That is why we collect more data points via the PE so as to minimize the chance of your project being affected by evaluator-bias.
- PE is also used to evaluate your manual testing skills, product evaluation skills, effort estimation skills etc.
- Note that significant project components are not graded solely based on peer ratings. Rather, PE data are mostly used to cross-validate tutors' grades and identify cases that need further investigation. When peer inputs are used for grading, they are usually combined with tutor evaluations with appropriate weight for each. In some cases ratings from team members are given a higher weight compared to ratings from other peers, if that is appropriate.
- Note that the PE is not a means of pitting you against each other. Developers and testers play for the same side; they need to push each other to improve the quality of their work -- not bring down each other.
Grading:
- Your performance in the practical exam will affect your final grade and your peers', as explained in Admin: Project Grading section.
- As such, we have put in measures to identify and penalize insincere/random evaluations.
- Also see:
Admin tP Grading → Notes on how marks are calculated for PE
PE Preparation
- It's similar to,
PE-D Preparation
-
Ensure that you have accepted the invitation to join the GitHub org used by the module. Go to https://github.com/nus-cs2103-AY1920S2 to accept the invitation.
-
Ensure you have access to a computer that is able to run module projects e.g. has the right Java version.
- Download the latest CATcher and ensure you can run it on your computer.
Issues created for PED and PE need to be in a precise format for our grading scripts to work. Incorrectly-formatted responses will have to discarded. Therefore, you are strongly recommended to use CATcher for PED and PE activities. If you want to give your response via GitHub instead, please get our permission first.
- Create a public repo in your GitHub account with the following name:
- PE Dry Run:
ped - PE:
pe
- PE Dry Run:
- Enable its issue tracker and add the following labels to it (the label names should be precisely as given).
Bug Severity labels:
severity.VeryLow: A flaw that is purely cosmetic and does not affect usage e.g., a typo/spacing/layout/color/font issues in the docs or the UI that doesn't affect usage.severity.Low: A flaw that is unlikely to affect normal operations of the product. Appears only in very rare situations and causes a minor inconvenience only.severity.Medium: A flaw that causes occasional inconvenience to some users but they can continue to use the product.severity.High: A flaw that affects most users and causes major problems for users. i.e., makes the product almost unusable for most users.
Type labels:
type.FunctionalityBug: A functionality does not work as specified/expected.type.FeatureFlaw: Some functionality missing from a feature delivered in v1.4 in a way that the feature becomes less useful to the intended target user for normal usage. i.e., the feature is not 'complete'. In other words, an acceptance testing bug that falls within the scope of v1.4 features. These issues are counted against the 'depth and completeness' of the feature.type.DocumentationBug: A flaw in the documentation that can potentially affect the user e.g., a missing step, a wrong instruction, typos that affect users
-
Have a good screen grab tool with annotation features so that you can quickly take a screenshot of a bug, annotate it, and post in the issue tracker.
- You can use Ctrl+V to paste a picture from the clipboard into a text box in bug report.
-
Download the product to be tested notifications are likely to go out on the morning of the PE/PE-D sessionafter you have been notified of which team you have been allocated to test.
-
Charge your computer before coming to the session. The testing venue might not have enough charging points.
PE Phase 1: Bug Reporting
PE Phase 1 is an 'exam', to be done under exam conditions:
- You are not allowed to communicate with others (except the invigilators).
- You are not allowed to share your work with others.
- Violators will be reported to the university for disciplinary action.
- When, where: Week 13 lecture
PE Phase 1 - Part I Product Testing [60 minutes]
- Test the product and report bugs as described below. You may report both product bugs and documentation bugs during this period.
Testing instructions for PE and PE-D
a) Launching the JAR file
- Put the jar file in an empty folder.
- Open a command window. Run the
java -versioncommand to ensure you are using Java 11. - Launch the jar file using the
java -jarcommand (do not use double-clicking). - If the product doesn't work at all: If the product fails catastrophically e.g., cannot even launch, you can test the fallback team allocated to you. But in this case you must inform us immediately after the session so that we can send your bug reports to the correct team.
- PE-D: Download the JAR file from their GitHub page
- PE: 1. Download from LumiNUS all files submitted by the team (i.e. jar file, User Guide, Developer Guide, and Project Portfolio Pages) into an empty folder.
b) What to test
- PE Dry Run (at v1.3):
- Test the product based on the User Guide (the UG is most likely accessible using the
helpcommand). - Do system testing first i.e., does the product work as specified by the documentation?. If there is time left, you can do acceptance testing as well i.e., does the product solve the problem it claims to solve?.
- Test the product based on the User Guide (the UG is most likely accessible using the
- PE (at v1.4):
- Test based on the Developer Guide (Appendix named Instructions for Manual Testing) and the User Guide. The testing instructions in the Developer Guide can provide you some guidance but if you follow those instructions strictly, you are unlikely to find many bugs. You can deviate from the instructions to probe areas that are more likely to have bugs.
- As before, do both system testing and acceptance testing but give priority to system testing as system-testing bugs can earn you more credit.
c) What bugs to report?
- PE Dry Run (at v1.3): You may report functionality bugs, UG bugs, and feature flaws.
Admin tP Grading → Functionality Bugs
Admin tP Grading → Functionality Bugs
Admin tP Grading → Possible UG Bugs
- PE (at v1.4): In addition to the reporting functionality bugs, UG bugs, and feature flaws, there will be an extra time given specifically for reporting documentation bugs (i.e., UG and DG bugs).
Admin tP Grading → Possible DG Bugs
- About posting suggestions:
- PE Dry Run (at v1.3): You can also post suggestions on how to improve the product. Be diplomatic when reporting bugs or suggesting improvements. For example, instead of criticising the current behavior, simply suggest alternatives to consider.
- PE (at v1.4): Do not post suggestions. But if a feature is missing a critical functionality that makes the feature less useful to the intended user, it can be reported as a bug of type
Type.FeatureFlaw.
d) How to report bugs
- Post bugs as you find them (i.e., do not wait to post all bugs at the end) because bug reports created/modified after the allocated time will not count.
- Launch CATcher, and login to the correct profile:
- PE Dry Run:
CS2103/T PE Dry run - PE:
CS2103/T PE
- PE Dry Run:
- Post bugs using CATcher.
- Post bug reports in the following repo you created earlier:
- PE Dry Run:
ped - PE:
pe
- PE Dry Run:
- The whole description of the bug should be in the issue description i.e., do not add comments to the issue.
e) Bug report format
- Each bug should be a separate issue.
- Write good quality bug reports; poor quality or incorrect bug reports will not earn credit.
- Use a descriptive title.
- Give a good description of the bug with steps to reproduce and screenshots. If the receiving team cannot reproduce the bug, you will not be able to get credit for it.
- Assign exactly one
severity.*label to the bug report. Bug report without a severity label are consideredseverity.Low(lower severity bugs earn lower credit)
Bug Severity labels:
severity.VeryLow: A flaw that is purely cosmetic and does not affect usage e.g., a typo/spacing/layout/color/font issues in the docs or the UI that doesn't affect usage.severity.Low: A flaw that is unlikely to affect normal operations of the product. Appears only in very rare situations and causes a minor inconvenience only.severity.Medium: A flaw that causes occasional inconvenience to some users but they can continue to use the product.severity.High: A flaw that affects most users and causes major problems for users. i.e., makes the product almost unusable for most users.
- Assign exactly one
type.*label to the issue.
Type labels:
type.FunctionalityBug: A functionality does not work as specified/expected.type.FeatureFlaw: Some functionality missing from a feature delivered in v1.4 in a way that the feature becomes less useful to the intended target user for normal usage. i.e., the feature is not 'complete'. In other words, an acceptance testing bug that falls within the scope of v1.4 features. These issues are counted against the 'depth and completeness' of the feature.type.DocumentationBug: A flaw in the documentation that can potentially affect the user e.g., a missing step, a wrong instruction, typos that affect users
PE Phase 1 - Part II Evaluating Documents [30 minutes]
- This slot is for reporting documentation bugs only. You may report bugs related to UG and DG.
- For each bug reported, cite evidence and justify. For example, if you think the explanation of a feature is too brief, explain what information is missing and why the omission hinders the reader.
Admin tP Grading → Possible UG Bugs
Admin tP Grading → Possible DG Bugs
PE Phase 1 - Part III Overall Evaluation [15 minutes]
- To be submitted via TEAMMATES. You are recommended to complete this during the PE session itself, but you have until the end of the day to submit (or revise) your submissions.
Important questions included in the evaluation:
Evaluate based on the User Guide and the actual product behavior.
| Criterion | Unable to judge | Low | Medium | High |
|---|---|---|---|---|
target user |
not specified | clearly specified and narrowed down appropriately | ||
value proposition |
not specified | The value to target user is low. App is not worth using | Some small group of target users might find the app worth using | Most of the target users are likely to find the app worth using |
optimized for target user |
Not enough focus for CLI users | Mostly CLI-based, but cumbersome to use most of the time | feels like a fast typist can be more productive with the app, compared to an equivalent GUI app without a CLI |
Evaluate based on fit-for-purpose, from the perspective of a target user.
For reference, the AB3 UG is here.
Evaluate based on fit-for-purpose from the perspective of a new team member trying to understand the product's internal design by reading the DG.
For reference, the AB3 DG is here.
0..30] e.g., if you give 8, that means the team's effort is about 80% of that spent on creating AB3. We expect most typical teams to score near to 10.
- Do read the DG appendix named
Effort, if any. - Consider implementation work only (i.e., exclude testing, documentation, project management etc.)
- Do not give a high value just to be nice. Your responses will be used to evaluate your effort estimation skills.
PE Phase 2: Developer Response
This phase is for you to respond to the bug reports you received.
Duration: The review period will start around 1 day after the PE (exact time to be announced) and will last until the following Monday midnight (within 3 days). However, you are recommended to finish this task ASAP, to minimize cutting into your exam preparation work.
Bug reviewing is recommended to be done as a team as some of the decisions need team consensus.
Instructions for Reviewing Bug Reports
- Don't freak out if there are lot of bug reports. Many can be duplicates and some can be false positives. In any case, we anticipate that all of these products will have some bugs and our penalty for bugs is not harsh. Furthermore, it depends on the severity of the bug. Some bug may not even be penalized.
- CATcher does not come with a UG, but the UI is fairly intuitive (there are tool tips too). Do post in the forum if you need any guidance with its usage.
- Also note that CATcher hasn't been battle-tested for this phase, in particular, w.r.t. multiple team members editing the same issue concurrently. It is ideal if the team members get together and work through the issues together. If you think others might be editing the same issues at the same time, use the
Syncbutton at the top to force-sync your view with the latest data from GitHub.
CS2103/T PE. It will show all the bugs assigned to your team, divided into three sections:
Issues Pending Responses- Issues that your team has not processed yet.Issues Responded- Your job is to get all issues to the second category.Faulty Issues- e.g., Bugs marked as duplicates of each other, or causing circular duplicate relationships. Fix the problem given so that no issues remain in this category.
You must use CATcher. You are strictly prohibited from editing PE bug reports using the GitHub Web interface as it can can render bug reports unprocessable by CATcher, sometimes in an irreversible ways, and can affect the entire class. Please contact the prof if you are unable to use CATcher for some reason.
- If a bug seems to be for a different product (i.e. wrongly assigned to your team), let us know ASAP.
- If the bug is reported multiple times,
- Mark all copies EXCEPT one as duplicates of the one left out (let's call that one the original) using the
duplicatetag. - If the duplicates have different severity levels, you should keep the one with the highest severity as the original. But you can downgrade the severity of the original or the duplicates.
- For each group of duplicates, all duplicates should point to one original i.e., no multiple levels of duplicates, and no cyclical duplication relationships.
- If the duplication status is eventually accepted, all duplicates will be assumed to have inherited the
type.*andseverity.*from the original.
- Mark all copies EXCEPT one as duplicates of the one left out (let's call that one the original) using the
- Apply exactly one of these labels (if missing, we assign:
response.Accepted)
Response Labels:
response.Accepted: You accept it as a bug.response.NotInScope: It is a valid issue but not something the team should be penalized for e.g., it was not related to features delivered in v1.4.response.Rejected: What tester treated as a bug is in fact the expected behavior. You can reject bugs that you inherited from AB3.response.CannotReproduce: You are unable to reproduce the behavior reported in the bug after multiple tries.response.IssueUnclear: The issue description is not clear. Don't post comments asking the tester to give more info. The tester will not be able to see those comments because the bug reports are anonymous.
- Apply exactly one of these labels (if missing, we assign:
type.FunctionalityBug)
Type labels:
type.FunctionalityBug: A functionality does not work as specified/expected.type.FeatureFlaw: Some functionality missing from a feature delivered in v1.4 in a way that the feature becomes less useful to the intended target user for normal usage. i.e., the feature is not 'complete'. In other words, an acceptance testing bug that falls within the scope of v1.4 features. These issues are counted against the 'depth and completeness' of the feature.type.DocumentationBug: A flaw in the documentation that can potentially affect the user e.g., a missing step, a wrong instruction, typos that affect users
- If you disagree with the original severity assigned to the bug, you may change it to the correct level.
Bug Severity labels:
severity.VeryLow: A flaw that is purely cosmetic and does not affect usage e.g., a typo/spacing/layout/color/font issues in the docs or the UI that doesn't affect usage.severity.Low: A flaw that is unlikely to affect normal operations of the product. Appears only in very rare situations and causes a minor inconvenience only.severity.Medium: A flaw that causes occasional inconvenience to some users but they can continue to use the product.severity.High: A flaw that affects most users and causes major problems for users. i.e., makes the product almost unusable for most users.
- Decide who should fix the bug. Use the
Assigneesfield to assign the issue to that person(s). There is no need to actually fix the bug though. It's simply an indication/acceptance of responsibility. If there is no assignee, we will distribute the penalty for that bug (if any) among all team members.- If it is not easy to decide the assignee(s), we recommend (but not enforce) that the feature owner should be assigned bugs related to the feature, Reason: The feature owner should have defended the feature against bugs using automated tests and defensive coding techniques.
- It is expected that PR reviewers will take part of the responsibilities if they were given a reasonable time to review the PR (even if they never review it), provided the bug should have been reasonably apparent to a reviewer. For example, if someone put up a PR for review but merged it un-reviewed after two days because no one bothered to review it, it's only fair that the whole team (or whoever was assigned to review the PR) take a share of the blame.
-
As far as possible, choose the correct
type.*,severity.*, and assignees even for bugs you are not accepting or for bugs that are marked as duplicates. Reason: your non-acceptance or duplication status may be rejected in a later phase, in which case we need to grade it as an accepted/non-duplicate bug. -
Justify your response. For all of the following cases, you must add a comment justifying your stance. Testers will get to respond to all those cases and will be double-checked by the teaching team in later phases. Indiscriminate/unreasonable dev/tester responses, if deemed as a case of trying to game the system, will be penalized.
- downgrading severity
- non-acceptance of a bug
- changing the bug type
- non-obvious duplicate
PE Phase 3: Tester Response
- In this phase you will get to state whether you agree or disagree with the dev response to the bugs you reported. If a bug reported has been subjected to any of the below by the receiving team, you can record your objections and the reason for the objection.
- not accepted
- severity downgraded
- bug type changed
- As before, consider carefully before you object to a team's response. If many of your objections were overruled by the teaching team later, you will lose marks for not being able to evaluate a bug report properly.
- This phase is optional. If you do not respond to a dev response, we'll assume that you agree with it.
- Deadline: Reading week Thursday 2359 (within 2 days)
- Procedure:
- When the phase has been announced as open, login to CATcher as usual (profile:
CS2103/T PE). - For the issues listed, go to the details, and read the team's response.
- If you disagree with any of the items listed, tick on the
I disagreetick box and enter your justification for the disagreement, and clickSave.
You must use CATcher. You are strictly prohibited from editing PE bug reports using the GitHub Web interface as it can can render bug reports unprocessable by CATcher, sometimes in an irreversible ways, and can affect the entire class. Please contact the prof if you are unable to use CATcher for some reason.
PE Phase 4: Tutor Moderation
- In this phase tutors will look through all dev responses you objected to in the previous phase and decide on a final outcome.
- In the unlikely we need your inputs, the tutor will contact you.